A wet or musty basement waterproof quietly damages your home and wallet, but you can stop it with the right approach. You can protect your foundation and prevent mold by diagnosing the moisture source, choosing the right interior or exterior methods, and using proven solutions like interior sealants, drainage channels, and a sump pump when needed.
This post shows how to assess whether surface dampness or active leaks cause the problem, compares cost and durability of common fixes, and outlines practical steps you can take yourself or with a pro. Expect clear guidance on when to patch, when to install drainage, and how to prioritize fixes so your basement stays dry for the long term.
Understanding Basement Waterproofing
You’ll learn the common basement waterproofing methods, clear signs that moisture is a problem, and the usual causes so you can pick effective fixes. Focus on methods that address the specific entry points and the root causes you identify.
Types of Basement Waterproofing Methods
Interior drainage systems channel water that reaches the footing into a sump pit. These systems typically include a perforated pipe, a sump pump, and a discharge line that directs water away from the foundation. Use interior systems when exterior excavation isn’t practical or when you’re stopping existing seepage.
Exterior waterproofing applies a membrane or drainage board to the outside of foundation walls and adds exterior footing drains. This prevents hydrostatic pressure from building against the wall. Choose exterior solutions for long‑term protection and when you can excavate around the foundation.
Crack injection and sealants fix specific entry points. Epoxy or polyurethane injections bond or seal cracks from the inside. Use them for isolated cracks that aren’t caused by active structural movement.
Surface grading, gutters, and downspout extensions reduce surface water near your foundation. Combine these with other methods to limit the volume of water the foundation must resist.
Signs Your Basement Needs Waterproofing
You will often see visible water stains or efflorescence on concrete or masonry walls. White mineral deposits indicate moisture wicking through the wall, even if you don’t see standing water. Inspect walls after heavy rain to confirm active seepage.
Musty odors, visible mold, or persistent high humidity indicate chronic moisture. These conditions harm stored items and indoor air quality. Use a hygrometer to track relative humidity—values consistently above 60% suggest you need intervention.
Cracks, bulging walls, or peeling paint point to pressure or movement from water. Hairline cracks can let in water; larger vertical or horizontal cracks may indicate structural concerns. Check floor-wall joints and around window wells where leaks commonly begin.
Common Causes of Basement Water Problems
Poor exterior grading lets rainwater pool against the foundation. If soil slopes toward the house or the grade is flat, surface runoff will collect at the base of the wall. Regrade soil to slope at least 6 inches over the first 10 feet where possible.
Clogged or missing gutters and short downspouts dump roof runoff close to the foundation. Extend downspouts at least 6–10 feet away or tie into a storm drain. Clean gutters twice a year to prevent overflow during storms.
Hydrostatic pressure from a high water table pushes groundwater through joints and pores in concrete. Heavy, prolonged rain or poor site drainage raises the water table. Footing drains, exterior membranes, and sump pumps address pressure-driven entry.
Poorly maintained window wells, cracked foundation walls, and improperly compacted backfill can also cause leaks. Inspect wells for drains, replace torn well covers, and ensure backfill uses free‑draining material away from the foundation.
Implementing Effective Waterproofing Solutions
You will choose between stopping water at the foundation exterior or managing it inside, select products rated for your soil and moisture levels, and follow a step-by-step prep and installation sequence that protects structure and finishes.
Interior vs. Exterior Waterproofing
Exterior waterproofing prevents water from reaching your foundation by creating an outer barrier and improving site drainage. Typical measures include excavating around the foundation, applying a waterproof membrane or cementitious coating, and installing exterior drain tiles that route water to a discharge point. This approach is best when hydrostatic pressure or chronic seepage exists and when you can access the outside of the wall.
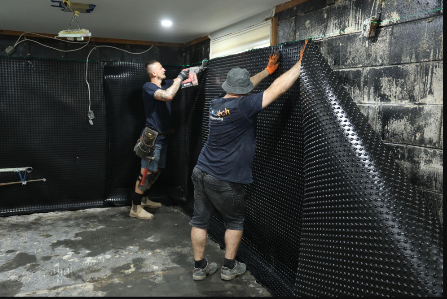
Interior waterproofing controls water that has already entered your basement. Common tactics include installing an interior perimeter drainage system (weeping tile), a sump pump, and sealing cracks with epoxy or polyurethane injections. Choose interior systems when exterior excavation is impractical, or when you need a faster, lower-cost fix. Note: interior solutions manage water but don’t stop saturated soil against the foundation.
See also: Child Daycare Near Me: Choosing Safe, Affordable Care Close to Home
Choosing Materials and Products
Match materials to your basement conditions: for high hydrostatic pressure use heavy-duty, elastomeric membranes or bituminous coatings that resist constant pressure. For hairline cracks, select flexible polyurethane injections; for structural cracks, use epoxy resin injections rated for load transfer. Use HDPE or PVC drain tiles with graded gravel and geotextile fabric to ensure long-term flow and prevent clogging.
Pick a sump pump with a capacity (GPM) suited to your region’s worst-case inflow and add dual pumps or battery backup if power outages are likely. Choose floor and wall sealants labeled for below-grade use and check manufacturer warranties and installation requirements. Buy materials with proven freeze-thaw resistance if you live in a cold climate.
Preparation and Installation Process
Start with a thorough inspection: identify water entry points, test for hydrostatic pressure, and check soil grading and downspout discharge. Document crack widths and moisture patterns before work begins. For exterior jobs, excavate to the footing, clean the wall, apply the membrane or coating, and install exterior drain tile sloped to a daylight or sump discharge.
For interior installations, cut and remove a narrow trench along the slab edge, slope and bed the drain tile in gravel, tie it into a sump basin, and compact the slab patch back over the system. Seal visible cracks with appropriate injection material after surface preparation. Test the system by running water into the sump area and monitoring flow and pump cycling to confirm proper operation.